Quick-start guide
Let's make a basic ad serving setup. You will learn:
- How to create a publisher.
- How to create a zone.
- How to create an advertiser.
- How to create a campaign.
- How to create an ad item.
- How to assign a campaign to a zone.
- How to place zone tags.
Step 1: Create a publisher

- Click on Publishers in the left navigation menu to go to the main Publishers section.
- Click Add Publisher. The New Publisher page will appear.
- Give your publisher a name then click Create Publisher. To follow this guide, use the name Example Publisher. The other fields are optional, so you can leave them as they are. The newly created publisher will appear in the table of publishers in the main Publishers section.
Step 2: Create a zone

- Click on the publisher you created in Step 1 (Example Publisher) to go to its section. Among other things, the publisher's section is where you manage zones, which are spaces on the publisher's site where ads will be shown.
- Click Add Zone. A window to select which zone type to create will appear. To follow this guide, click on Standard Zone.
- Give the zone a name then choose its size. It helps to name zones clearly and consistently to make them easy to identify throughout the AdButler interface. To follow this guide, create a fixed 300x250 zone and name it Example Zone.

- Click Create Zone to finish setting up your zone. The newly created zone will appear in the table of zones in the section of the publisher to which it belongs. The table shows the name, type, and size of created zones, as well as the number of ad items and campaigns in each zone. There is also a handy button that lets you get zone tags, which are explained later in this guide.
Now that you have a publisher and a zone inside that publisher, you can create an advertiser that will serve ads to the zone.
Step 3: Create an advertiser

- Click Advertisers in the left navigation menu to go to the main Advertisers section.
- Click Add Advertiser. The New Advertiser page will appear.
- Give your advertiser a name then click Save this Advertiser. To follow this guide, use the name Example Advertiser. The newly created advertiser will appear in the table of advertisers in the Advertisers section.
Step 4: Create a campaign

- Click on the advertiser you created in step 3 (Example Advertiser) to go to its section.
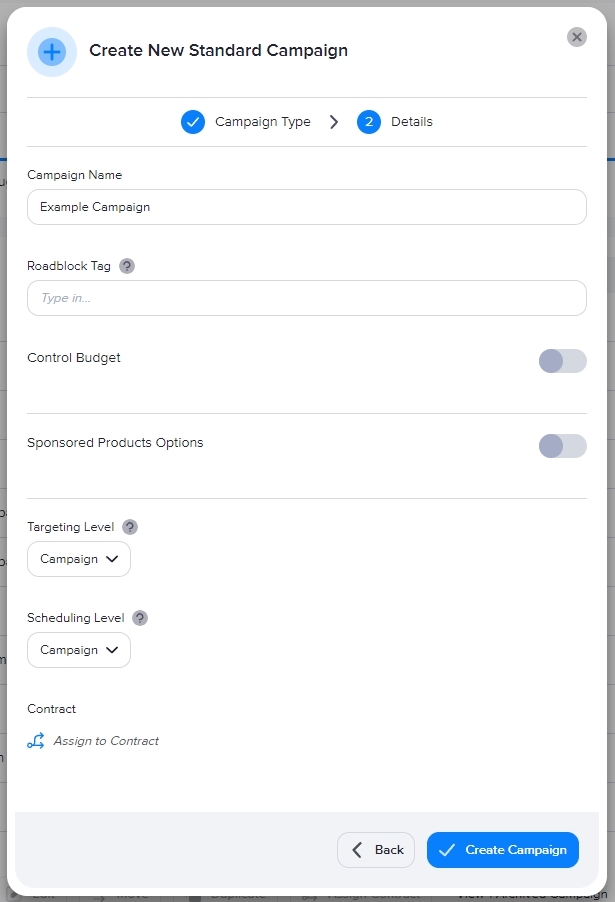
- Click Add Campaign on the top right of the Campaigns table. A window to select which campaign type to create will appear. To follow this guide, click Standard Campaign.
- Give the campaign a name then click Create Campaign. To follow this guide, use the name Example Campaign. The newly created campaign will appear in the table of campaigns in the section of the advertiser to which it belongs.

Step 5: Create an ad item

- Click on the campaign you created in Step 4 (Example Campaign) to go to its section.
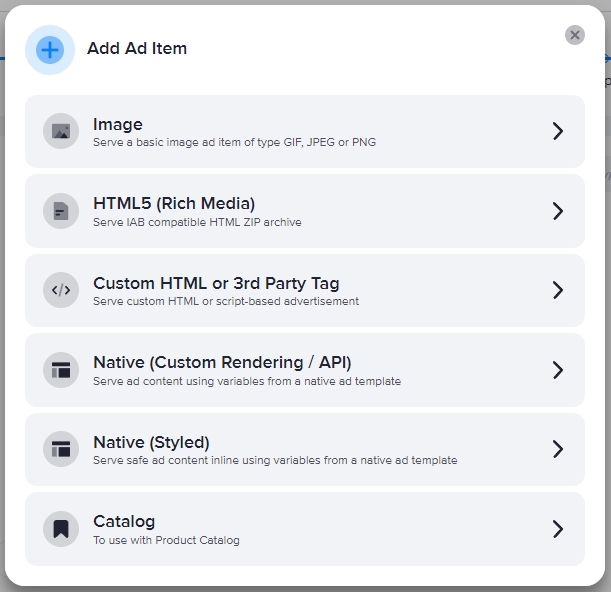
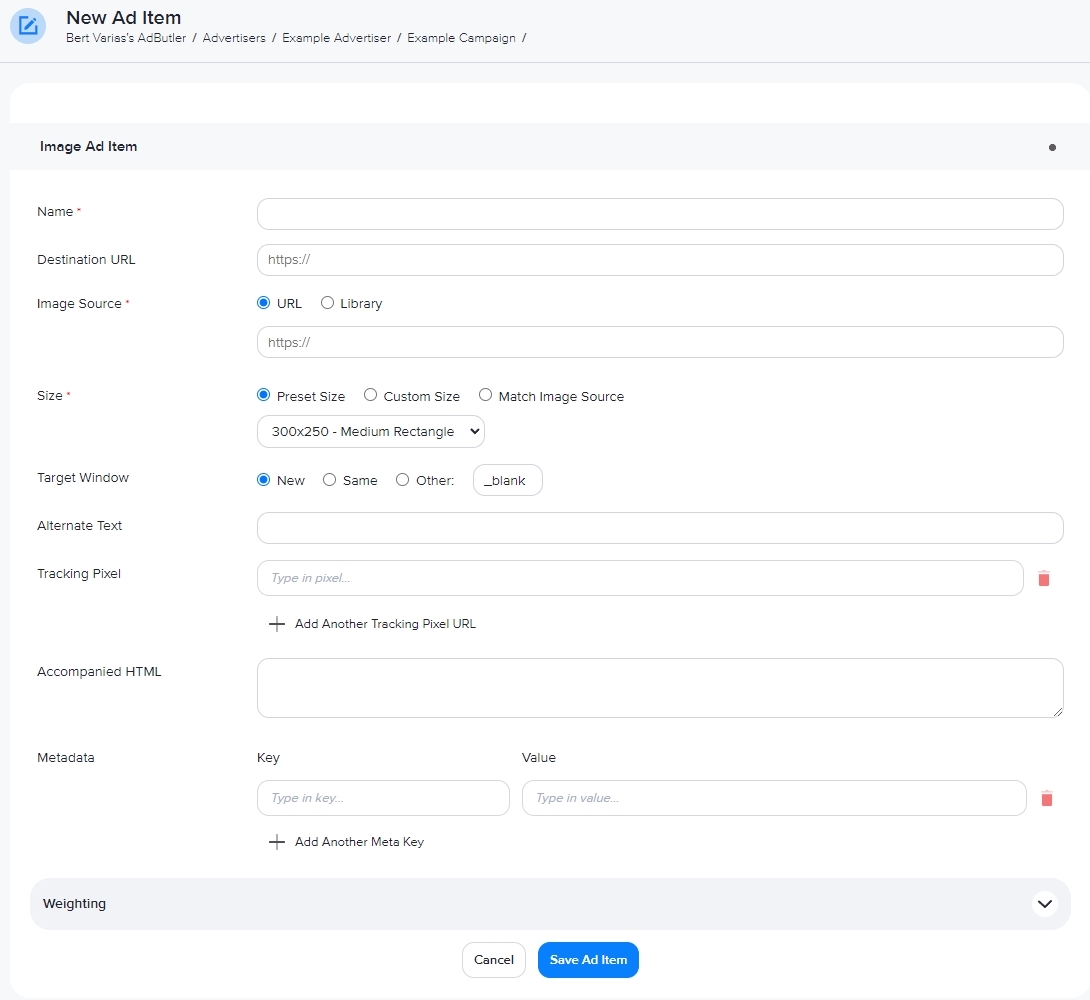
- Click Add Ad Item on the top right of the Ad Items table. A window to select which ad item to create will appear. To follow this guide, click on Image. The New Ad Item page will appear.

- Give your ad item a name. To follow this guide, use Example Ad Item. Under Image source, click Library then Browse... and upload an image. Under Size, you must select or enter a resolution that matches the one in the zone to which this ad item will be served. If you've been following this guide, the zone you created in Step 2 has a resolution of 300x250, so that's what you should select for this ad item as well. Leave the other fields as they are. For more information about image ad item fields, read How to create an image ad item.

- Click Save Ad Item to finish creating the ad item. It will appear in the table of ad items in the section of the campaign to which it belongs. You can check what the ad looks like by clicking on its name in the table then clicking Preview.
Now that you have an ad item in your campaign, you can assign the campaign to an existing publisher zone.
Step 6: Assign the campaign to the zone

- From a campaign's section, click Assign to Zone on the top right of the Zone Assignments table. A window to select eligible zones will appear.
- Click on the zone you created in Step 2 (Example Zone). The assignment details page will appear. You will be asked to select which serve method to use. For more information, read Serve Method Options. To follow this guide, select Fixed Delivery.
- The rest of the assignment details fields will appear. To follow this guide, leave them as they are. For more information, read Pacing & Schedule, Financial settings, Frequency Capping, and Targeting. Click Save. The name of the zone to which you assigned the campaign will appear in the Zone Assignments table in the campaign page.

Now that you've assigned a campaign to a zone, you can generate a zone tag. It's a snippet of code that must be placed on the publisher's website to allow the ads in the campaign to be served when the page is loaded.
Step 7: Place the zone tag into your site

Click Publishers in the left navigation menu to go to the main Publishers section.
Click on the publisher you created in Step 1 (Example Publisher) to go to its section.
Click on Get Tags in the Zone Tags column of the zone you created in Step 2 (Example Zone). The Zone Tags window will appear. To follow this guide, leave the fields as they are. For more information, read Zone tag overview.


- If you are the publisher, you can copy and paste the code on your website. You can also email the zone tag from this window.
This concludes the guide. The campaign you created should be able to serve ads to the website where the zone tag was placed. Each time the page loads, the tag will make a request to AdButler's servers. The page will then receive the ad that was assigned to that zone.
This demonstrates the core function of AdButler, but there are many ways to customize your ad serving setup. We encourage you to read more of our documentation. You can also get in touch with our support team by opening a support ticket while you are logged in to your account.