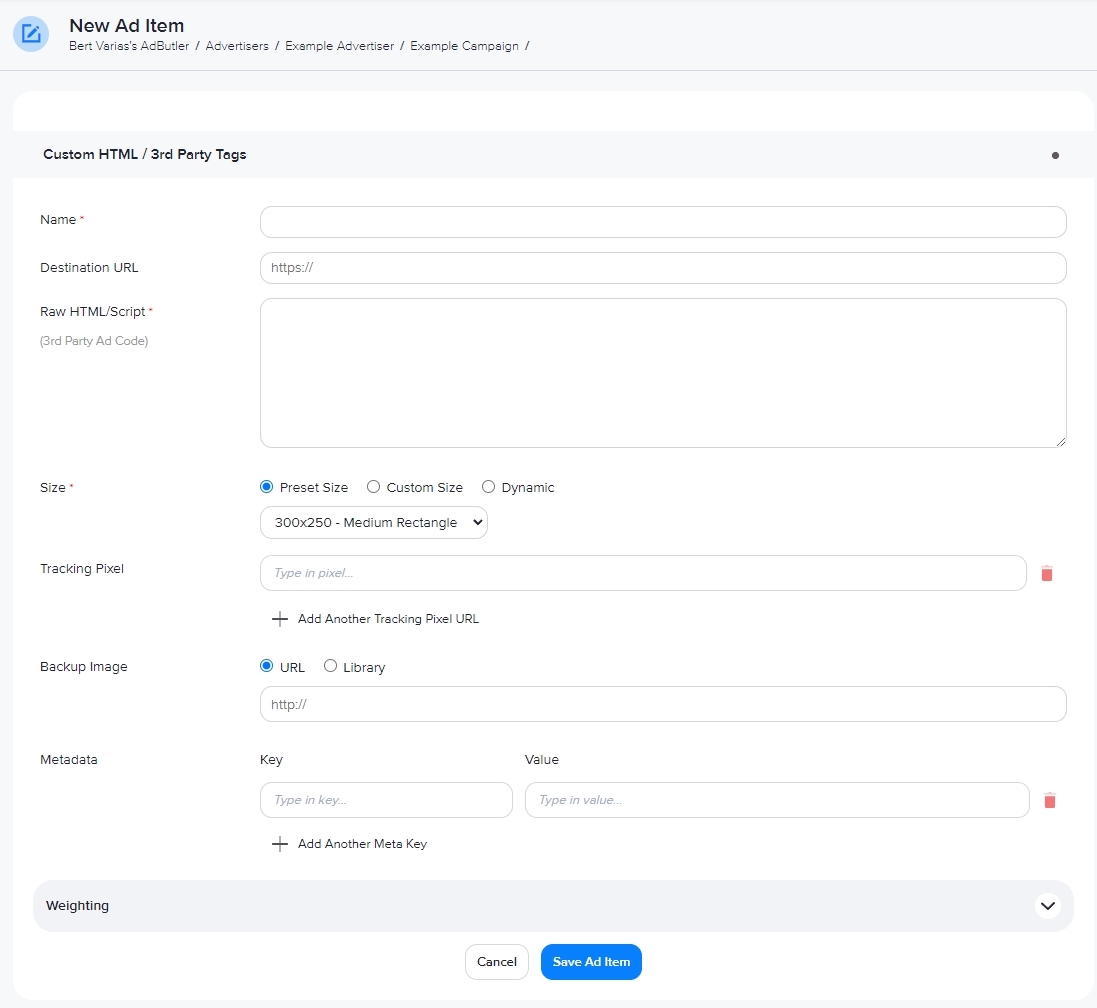
How to create a custom HTML/Third party tag ad item
Custom HTML / third party ad tags are used to serve custom ads and third party ads from an external source such as an ad exchange. For more information on the latter, read Serving third party ad tags.
Creating a custom HTML/Third party tag ad item

- Go to the section of the relevant campaign (Advertisers > Your Advertiser > Your Campaign).
- Click Add Ad Item at the top right of the Ad Items table. The Ad Item type window will appear.
- Click Custom HTML or 3rd Party Tag. The New Ad Item page will appear.

- Give the ad item a name.
- Fill in the Destination URL field based on what URL you have:
- If you have a click tracking URL or destination URL, add our click tracking macro to the ad creative and place the provided URL into the Destination URL field. If you enter a destination URL, you can test it by clicking Open Destination URL to the right of the field.
- If you don't have a click tracking URL or destination URL, and there is no URL in the ad creative, add our tracking macro to the creative, and put a dummy URL into the Destination URL field. You can put your homepage URL to be safe. If your ad isn't asking viewers to click on it, it's not going to be an issue anyway.
- If you don't have a click tracking URL or destination URL, but there is a URL in the ad creative, leave the Destination URL field blank. Add our click tracking macro to the creative, ensuring that it sits directly before the URL.
For more information, read Basic macro glossary and Examples of common third party ad tags.
- Enter the HTML or script. If you have saved HTML code in the Templates section, you can load the template using the dropdown menu above the Raw HTML/Script field.
If you entered a JavaScript ad tag from AdForm, Ad Glare, Flash Talking, and Sizmek, or an INS or iframe tag from DoubleClick, AdButler will give you the option to automatically enter the [TRACKING_LINK] or [TRACKING_LINK_ENCODED] macro to the appropriate spot in the tag.
- Set the size of the ad item. Be sure to match the dimensions of the ad creative.
If you set the size to Dynamic, you will be able to assign this ad item only to a zone that also has a dynamic size.
- Enter a tracking pixel link. Click + Add Another Tracking Pixel URL to add more tracking pixel links. Click on the red trash can icon to delete a tracking pixel link. (optional)
- Enter the URL or upload a backup image. (optional)
- Add metadata entries. (optional) For more information, read How to edit zone metadata.
- Click on Weighting to set the ad item's static weight. (optional) For more information on weight, read Pacing & schedule.
- Click Save Ad Item. You will be taken back to the campaign section, and the ad item you just created will be listed in the table of ad items.
Configuring zone tags
Custom HTML ad items are usually served using an asynchronous JavaScript zone tag. However, if you need the ad item to be responsive or to interact directly with the page, use a basic (synchronous) JavaScript tag. For more information, read Types of zone tags.
If you're going to use a Google AdSense tag, make sure all zones to which the ad item will be assigned will use a basic (synchronous) JavaScript zone tag. This is required by Google's delivery policy, and not doing so could result in your AdSense account being disabled. Always confirm with your third party provider how their tags should be served with AdButler.